Blog

  • visions-gui

    Visions GUI

    An offline python frontend for the QuadVisions Colab Notebook using tkinter. It offers basic options and interactively displays the generating image. So far PyramidVisions, FourierVisions and CLIP + CPPN are implemented. Image generation code: Jens Goldberg / Aransentin, Colab by Philipuss#4066. Now features Deep Daze and Big Sleep by lucidrains.

    Installation

    VisionsGUI was tested under Arch Linux and Windows 10 on a NVIDIA RTX 2070 Super. PyramidVisions, DirectVisions and FourierVisions require a card with at least 4GB of VRAM. The VRAM consumption of Deep Daze and Big Sleep is variable and mostly depends on the image size and depth. CLIP + CPPN requires more than 8GB. CPU only is currently not supported.

    Dependencies

    Python and CUDA are required, the remaining dependencies can be installed via pip. Using a virtual environment like venv is preferred to keep the required pip packages seperate from your existing pip packages.

    Arch Linux

    1. Install Python 3 and pip via pacman -S python python-pip
    2. Install the CUDA 11 toolkit via pacman -S cuda
    3. Install the pip requirements: pip install -r requirements.txt

    Windows

    1. Install Python 3
    2. Install the CUDA 11 toolkit
    3. Install the pip requirements: pip.exe install -r requirements.txt

    Other Linux distros

    Python 3 should be available as a package for most distros but CUDA 11 might not be. In the latter case, an installer is available on NVIDIA’s site.

    Usage

    To start, run python visions-gui.py. An internet connection is only required when running a model for the first time. No connection is required after the model has been downloaded. alt text

    Modules

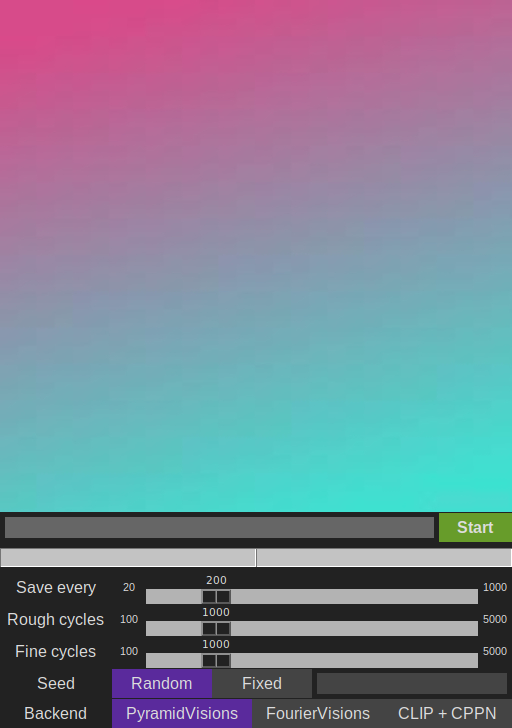
    The gui is made up of multiple modules which offer feedback to the user and allow to change a handful of settings.

    Image viewer

    The image viewer displays the current progress of the image and is periodically updated during generation. The displayed images are also accessible in the images folder.

    Prompt bar

    The prompt bar consists of a text field and a start / stop toggle button. A prompt is entered into the text field and the image will be generated as soon as the button is pressed. To stop, press the button again. The button also serves as the gui’s state:

    Color State
    Green The model is ready and waiting to be started
    Yellow The model is currently generating an image
    Red An error occured

    Progress bar

    The progress bar shows the progress of all stages.

    Settings panel

    The settings panel contains a few option for generating an image. Not all settings are available for all models:

    Setting Description
    Save every Cycles completed before displaying and saving the next image. Lower values add more overhead.
    Scale Changes the size of the output image.
    Rough cycles Cycles during the first stage.
    Fine cycles Cycles during the second stage.
    Seed If a random or fixed seed is used. If fixed is selected, uses the the seed entered in the entry field to the right.
    Backend Which model to use

    Add your own model

    VisionsGUI is expanded by adding model code and model settings to two python models without having to modify the existing classes. Have a look at the existing models and their settings definitions if you are unsure on how to set up the classes.

    Output

    To work with the frontend, the model needs to save an image (currently .png support only) in the images/. folder.

    Create your inference module in the models/. folder. Each class in your module needs to inherit ThreadedWorker from worker.thread.

    Set the model up in the constructor and make sure to call the constructor of ThreadedWorker.

    Place the inference code in method called function.

    Define a list of integers named self.progress. The length of the list corresponds to the amount of different stages present in your model. The length only influences how many progress bars are show in the gui. At least on stage is required, otherwise the frontend wont stop refreshing the image and progress bar after the model finishes. Update the progress list after each iteration.

    Create a new class inheriting from SettingsPanel, accepting a tkinter Frame and with the following structure:

    • A constant called backend pointing to your model class type. In the constructor:
    • Call the constructor of SettingsPanel with the Frame.
    • A list called self.options containing instances of tkinter objects. These objects need to implement the get method which should return a dictionary of option names and their values.
    • Call self.pack_options() Define a method called apply_options(self, model) accepting an instance of your model. This function is called before the model is started:
    • Get the current settings set by the user with self.get_settings(). This call returns a dictionary containing all option name and value pairs. If the same option name is used more than once, the dictionary will contain a list of values for that name.
    • Set your model settings from the options above.

    Future stuff

    • Add DirectVisions
    • UI support for multiple text / weight pairs
    • UI support for variable image sizes
    • Compiled executables
    Visit original content creator repository https://github.com/CoppaMan/visions-gui
  • payment-sdk-android

    ⚠️ Whilst we make some improvements to our mobile experiences, we’ve temporarily removed the EMV 3DS SDK. Please contact ecom-reintegration@network.global to obtain the files you need.

    Payment SDK for Android

    Banner

    Build Status

    Specifications

    Android API Level:

    Android SDK and the sample merchant app support a minimum API level 21 (Android Kitkat). For more details, please refer to Android API level requirements online

    Languages

    Android SDK supports English and Arabic.

    Installation

    allprojects {
      repositories {
        ...
        maven { url 'https://jitpack.io' }
      }
    }
    
    dependencies {
      // Required
      implementation 'com.github.network-international.payment-sdk-android:payment-sdk-core:1.0.0'
    
      // For card payment
      implementation 'com.github.network-international.payment-sdk-android:payment-sdk:1.0.0'
    
      //For samsung payment
      implementation 'com.github.network-international.payment-sdk-android:payment-sdk-samsungpay:1.0.0'
    }

    payment-sdk-core

    This module contains the common interfaces and classes used by the other SDK modules.

    payment-sdk

    This SDK contains the Android Pay Page source code for card payment. The module handles getting card details from the User, and submitting payment requests to the Payment Gateway. If 3D Secure is required with the existing payment flow, this will be handled by the page page as well. A successful or failed payment response will be returned to merchant app in an Intent bundle.

    payment-sdk-samsungpay

    This SDK contains the Samsung Pay source code for samsung in-app payment journey.

    Card integration

    SDK provides the PaymentClient class to launch various payment methods and get payment in the merchant app. PaymentClient requires an activity instance parameter to be instantiated. Please see the sample app for more details about using PaymentClient. It requires an activity instance rather than a Context since card payment result could only return the result to a calling activity.

    The following code shows how to construct PaymentClient by passing an Activity reference:

    class PaymentClient(private val context: Activity)

    New Card API with Jetpack Compose Support

    version 4.0.0-rc1 introduces support for Jetpack Compose in our Card API! This release brings a modern and declarative way to implement card payment experiences.

    For detailed guidance and examples, refer to the documentation below:


    Card API

    PaymentClient.launchCardPayment(request: CardPaymentRequest, requestCode: Int)

    The card payment API internally launches another activity to get card details from the user, and control payment/3D Secure flows between the payment gateway and the merchant app. Once payment flow completes, onActivityResult is called on merchant’s activity (which is passed in constructor) and CardPaymentData type is returned in the data Intent. requestCode is used to filter out activity result requests to find out where activity response comes from. Please see HomeActivity.onActivityResult for more details in the sample merchant app or refer to the following code snippet to learn how to handle card payment response in your merchant app.

    override fun onActivityResult(
      requestCode: Int, resultCode: Int, data: Intent?) {
        super.onActivityResult(requestCode, resultCode, data)
        if (requestCode == CARD_PAYMENT_REQUEST_CODE) {
          when (resultCode) {
            Activity.RESULT_OK -> onCardPaymentResponse(CardPaymentData.getFromIntent(data!!))
            Activity.RESULT_CANCELED -> onCardPaymentCancelled()
          }
        }
      }
    }

    You may notice that requestCode parameter is the same value as we already passed on to launchCardPayment method. If the User presses the Back button and cancels the card payment flow, RESULT_CANCELED is returned as an activity resultcode.

    Result Code in CardPaymentData

    View the following code snippet to see how merchant app handles result code in CardPaymentData

    override fun onCardPaymentResponse(data: CardPaymentData) {
      when (data.code) {
        CardPaymentData.STATUS_PAYMENT_AUTHORIZED,
        CardPaymentData.STATUS_PAYMENT_CAPTURED -> {
          view.showOrderSuccessful()
        }
        CardPaymentData.STATUS_PAYMENT_FAILED -> {
          view.showError("Payment failed")
        }
        CardPaymentData.STATUS_GENERIC_ERROR -> {
          view.showError("Generic error(${data.reason})")
        }
        else -> IllegalArgumentException("Unknown payment response (${data.reason})")
      }
    }

    Result Codes Every possible result code is checked, and an appropriate action is taken:

    • STATUS_PAYMENT_CAPTURED shows order creation with “SALE” action parameter is successful.
    • STATUS_PAYMENT_AUTHORIZED shows order creation with “AUTH” action parameter is successful.
    • STATUS_PAYMENT_FAILED shows payment is not successful on payment gateway.
    • STATUS_GENERIC_ERROR: shows possible issues on the client side, for instance, network is not accessible or an unexpected error occurs.

    Saved Card Payment

    The saved card token serves as a secure means to facilitate payments through the SDK. For comprehensive instructions and illustrative code samples, please consult the detailed guide available here.

    Customizing SDK

    Customize pay button

    You can utilize the shouldShowOrderAmount method to control the visibility of the amount on the pay button. The default value is set to true.

    SDKConfig.shouldShowOrderAmount(true)

    Optional Alert dialog

    To enhance user experience, you can prompt an alert dialog when users attempt to close the payment page. This feature can be enabled or disabled using the shouldShowCancelAlert configuration method.

    SDKConfig.shouldShowCancelAlert(true)

    Customizing Colors in Payment

    To customize the colors in the Payment SDK for Android, developers can override specific color resources. please refer to detailed guide here

    Samsung pay integration

    Integrating Samsung Pay into your app is a straightforward process, similar to card payment integration. Follow these steps to seamlessly implement Samsung Pay:

    1. Refer to the Integration Guide: To begin, consult our comprehensive Samsung Pay Integration Guide. This guide provides detailed instructions and examples to help you integrate Samsung Pay effectively into your application.

    2. Troubleshooting and FAQs: If you encounter any issues during the integration process or have questions about Samsung Pay integration, please check our Troubleshooting and FAQs section. Here, you’ll find answers to common questions and solutions to common challenges.

    Attempt threeDSTwo on a payment

    paymentClient.executeThreeDS(paymentResponse: PaymentResponse, requestCode: Int)
    
    override fun onActivityResult(
        requestCode: Int, resultCode: Int, data: Intent?) {
        super.onActivityResult(requestCode, resultCode, data)
        if (requestCode == CARD_PAYMENT_REQUEST_CODE) {
            when (resultCode) {
                Activity.RESULT_OK -> onCardPaymentResponse(CardPaymentData.getFromIntent(data!!))
                Activity.RESULT_CANCELED -> onCardPaymentCancelled()
            }
        }
    }

    Use the above method to execute threeDS frictionless or challenge for a paymentResponse. Once the threeDS operation is completed, the onActivityResult method is called with the requestedCode and a CardPaymentResponse object is passed as the data element in the third argument. Use the same flow as handling a card response to assert the state of the payment for the order as shown in the previous section.

    Debugging build issues in your app

    Payment failure after card information is submitted

    Ensure your merchant account has EMV 3DS 2.0 enabled. Get in touch with our support to enable.

    Missing required architecture x86_64 in file…

    You need to compile and execute the project on a real device. The SDK is not compatible to be run on a simulator

    Duplicate class issue

    If you see the following error Duplicate class com.nimbusds.jose.jwk.KeyOperation found in modules jetified-ni-three-ds-two-android-sdk-1.0-runtime You need to identify another dependency in your app that has the same com.nimbusds.jose library and remove the duplicate copy

    For more details please refer to sample app integration SamsungPayPresenter.kt

    Visit original content creator repository https://github.com/network-international/payment-sdk-android
  • homelab-ops-ansible

    Homelab Ops Ansible Collections

    lint

    A suite of Ansible collections designed for efficient infrastructure automation. These collections focus on immutable infrastructure patterns and are geared towards a homelab environments while being robust enough for production use.

    Core Principles

    • Immutable Infrastructure: Replace rather than patch – making your infrastructure more reliable
    • Performance-Focused: Tasks run only when needed, optimized for speed without compromising security
    • Declarative Configuration: Define desired states clearly and achieve them consistently
    • Practical Solutions: Following best practices while staying pragmatic

    Collections

    Collection Capabilities Status
    🔧 block_device – Automated block device selection
    – Partition management
    – Filesystem creation
    – RAM disk setup
    block_device
    ⚙️ configure – Cloud-init configuration
    – Fstab configuration
    configure
    ☸️ k3s – Automated k3s cluster node deployment
    – Multi-node cluster setup
    – Flux CD installation
    – Kubeconfig extraction
    k3s
    💻 os – Prepare an OS with user specified set of packages
    – Upgrade all packages to latest
    – Optional kernel upgrade
    – Tune kernel settings (sysctl)
    – Configure kernel module loading
    – Update initramfs
    os
    📦 packages – Package installation/removal (with aptitude or from URL)
    – Prevent reinstallation for removed packages, if desired
    – Fast no-op shortcuit if requirements already met
    packages
    🥧 raspberry_pi – Kernel configuration (config.txt)
    – Kernel commandline parameter management (cmdline.txt)
    – Pi-specific optimizations
    raspberry_pi

    Key Features

    • Block Device Management: Automated disk provisioning, partitioning, and filesystem setup
    • Kubernetes Deployment: Streamlined k3s cluster setup with Flux CD integration
    • System Configuration: Comprehensive OS and service configuration management
    • Package Handling: Flexible package management across different architectures
    • Raspberry Pi Support: Specialized tools for Pi-based infrastructure

    Getting Started

    Each collection is designed for specific infrastructure needs:

    • Setting up storage?block_device collection handles automated disk management
    • Deploying Kubernetes?k3s collection provides streamlined cluster setup
    • Configuring systems?configure collection manages system settings
    • Managing packages?packages collection handles software deployment
    • Working with Raspberry Pi?raspberry_pi collection offers Pi-specific tools

    Visit each collection’s documentation for detailed usage instructions and examples.

    Quality Assurance

    • Comprehensive Molecule tests for each collection
    • Continuous Integration via GitHub Actions
    • Automated linting and syntax checking
    • Detailed documentation requirements

    Contributing

    We welcome contributions! See our Contributing Guide for:

    • Development setup
    • Code style guidelines
    • Testing requirements
    • Pull request process

    Community

    License

    This project is licensed under the GNU Affero General Public License v3.0 (AGPL-3.0) – see the LICENSE file for details.


    Built for the homelab community

    Visit original content creator repository https://github.com/ppat/homelab-ops-ansible
  • Directorio_Regen

    Directorio de Ecotecnias

    Este repositorio contiene una serie de herramientas y aplicaciones para crear un directorio de proveedores de ecotecnias y organizaciones en México y América Latina. El objetivo es facilitar la búsqueda de tecnologías regenerativas para la transformación de la vida urbana hacia un modelo más sostenible.

    Esta iniciativa es parte del proyecto Urbanika [ https://urbanika.notion.site/Urbanika-304277770b0e418ea279548983c3c0db ] para crear una red nacional y regional de proveedores confiables de Ecotecnias.

    Contenidos

    1. DatosScraper.py

    2. Directorio.py

      • Aplicación web desarrollada con Dash y Plotly para visualizar el directorio.
      • Permite filtrar y buscar proveedores por categoría.
      • Requiere las librerías dash, pandas y plotly.
      • Imagen: ![Página Principal de directorio]DirectorioPrincipal
      • Imagen: ![Página Categorias de directorio]DirectorioCategorias1
    3. Directorio3D.py

      • Visualización 3D (prueba) de los datos utilizando Plotly.
      • Requiere las librerías dash, pandas y plotly.
      • Imagen: ![Visualizador en 3D de datos del CSV]Ecotecnias3D
    4. data/PortalAmbiental.CSV

      • Archivo CSV generado a partir del scraping con datos de proveedores y organizaciones.
      • Imagen: ![Ejemplo Lista en CSV generada con el Script]EjemploListaEcotecnias

    Instalación

    Para instalar las dependencias necesarias, ejecuta el siguiente comando:

    ´bash pip install

    librerias

    beautifulsoup4 dash pandas plotly

    Contribuciones

    Este proyecto está en sus primeras etapas y está destinado a ser una herramienta útil para la comunidad. Si tienes sugerencias o mejoras, no dudes en contribuir.

    Contacto

    Para más información, ¡mis correos están abiertos! geovalente@proton.me .

    Nota: Este repositorio es parte de la misión de Urbanika para transformar las ciudades en comunidades regenerativas.

    Visit original content creator repository https://github.com/ValenteCreativo/Directorio_Regen
  • minesweeper-react-ts

    React.js Minesweeper by WillAiemi

    This is an attempt to rebuild the perfect Windowx XP Minesweeper. This project was bootstrapped using Create React App.

    Demo

    Click here to see the live demo.

    animated visual demonstration

    Installation & Usage

    To install this project, you must have Node.js or Yarn installed. I particularly recommend using Yarn.

    How to install and use

    Run the commands below in your terminal, inside the root folder of this project.

    Using Node.js (npm)

    npm run npm-quickstart

    Using Yarn

    yarn yarn-quickstart

    After this, the project will run on your http://localhost:3000. Enjoy!

    Roadmap

    There are a lot of features I still want to implement. I will be updating this list as I implement them.

    • REST API to record High Scores;
    • Unit tests;
    • Window drag & drop;
    • Close window button and “Desktop Icon” to open the game;
    • Add information about the author;
    • Shutdown button.

    Authors

    Willian Duarte

    You can find more about me in my social media below.

    GitHub Badge LinkedIn Badge

    License

    The MIT License (MIT)

    Copyright (c) 2021 Willian Duarte

    Permission is hereby granted, free of charge, to any person obtaining a copy of this software and associated documentation files (the “Software”), to deal in the Software without restriction, including without limitation the rights to use, copy, modify, merge, publish, distribute, sublicense, and/or sell copies of the Software, and to permit persons to whom the Software is furnished to do so, subject to the following conditions:

    The above copyright notice and this permission notice shall be included in all copies or substantial portions of the Software.

    THE SOFTWARE IS PROVIDED “AS IS”, WITHOUT WARRANTY OF ANY KIND, EXPRESS OR IMPLIED, INCLUDING BUT NOT LIMITED TO THE WARRANTIES OF MERCHANTABILITY, FITNESS FOR A PARTICULAR PURPOSE AND NONINFRINGEMENT. IN NO EVENT SHALL THE AUTHORS OR COPYRIGHT HOLDERS BE LIABLE FOR ANY CLAIM, DAMAGES OR OTHER LIABILITY, WHETHER IN AN ACTION OF CONTRACT, TORT OR OTHERWISE, ARISING FROM, OUT OF OR IN CONNECTION WITH THE SOFTWARE OR THE USE OR OTHER DEALINGS IN THE SOFTWARE.

    Visit original content creator repository https://github.com/willaiemi/minesweeper-react-ts
  • async-runner

    PHP Async Task Runner

    Build Status

    Run PHP tasks asynchronously with the PCNTL extension

    Installation

    composer require denismitr/async-runner

    Usage

    $wg = WaitGroup::create();
    $counter = 0;
    
    foreach (range(1, 10) as $i) {
        $wg->add(function () {
            usleep(200); // some action here that takes time
            return 5;
        })->then(function (int $result) use (&$counter) {
            $counter += $result;
        });
    }
    
    $wg->wait();
    
    $counter; // 50

    Example with AsyncTask inheritance

    // Create a class(es) that inherit from AsyncTask
    use Denismitr\Async\AsyncTask;
    
    class TestAsyncTask1 extends AsyncTask
    {
        public function __construct($passSomething)
        {
            // Some initialization here
        }
    
        public function run()
        {
            usleep(1000); // some action here
    
            return 'some result';
        }
    }
    
    // Run
    
    $wg = WaitGroup::create();
    
    $wg->add(new TestAsyncTask1($passSomething));
    $wg->add(new TestAsyncTask2($passSomething));
    
    $results = $wg->wait();
    
    foreach($results as $result) {
        // gives 2 results of 2 async tasks
    }

    You can check the result of each task by id, to help preserve the order

    $wg = WaitGroup::create();
    
    $idA = $wg->add(new TestAsyncTask('foo'))->getId();
    $idB = $wg->add(new TestAsyncTask('bar'))->getId();
    $idC = $wg->add(new TestAsyncTask('baz'))->getId();
    
    $results = $wg->wait();
    
    $this->assertEquals('foo', $results[$idA]);
    $this->assertEquals('bar', $results[$idB]);
    $this->assertEquals('baz', $results[$idC]);

    You can set max concurrent processes limit

    $wg = WaitGroup::create()->setMaxConcurrently(2);
    
    $startTime = microtime(true);
    
    foreach (range(1, 3) as $i) {
        $wg->add(function () {
            sleep(1);
        });
    }
    
    $wg->wait(); // Will run only 2 tasks in parallell, then the 3rd one

    You can set a timeout

    $wg = WaitGroup::create()->setTimeout(3);
    
    $timedOut = 0;
    
    foreach (range(1, 5) as $i) {
        $wg->add(function () use ($i) {
            sleep($i);
        })->timeout(function () use (&$timedOut) {
            $timedOut += 1;
        });
    }
    
    $wg->wait();
    
    $this->assertEquals(3, $timedOut);
    Visit original content creator repository https://github.com/denismitr/async-runner
  • jackit

    JackIT!!! The Game

    2D Side Scroller platforming game where you have to modify the game’s source code to complete levels

    Special thanks

    Jacob Hartman made the music. https://j2h2.com/

    Install

    1. Clone the repo or download the Windows MSI installer from the releases tab
    2. Have or get python 3.7 (or just use the installer on Windows)
    3. Get the requirements: pip3 install -r requirements.txt
    4. Run the game python3 game.py

    Playing

    1. Once the game loads there will be a welcome screen. Press enter to start playing
    2. Controls are “A” for left, “D” for right, “SPACE” for jump, “E” for interact, and “ESC” to get out of a code editor
    3. In the code editor use the arrow keys to move the cursor and the keyboard to type.
    4. All the code you type is run by the game. There are some protections but it’s not perfect. You can pretty much do anything.
    5. a config file site.cfg.json is created in the root of the repo when the game is run. You can modify this file, but I wouldn’t. A lot of the config options have only been tested with their default values.

    Visit original content creator repository
    https://github.com/laplante-sean/jackit

  • controller-framework

    Simple Kubernetes Controller Development Kit

    CodeQL Dependency Review Go Go Reference

    The controller-framework is a versatile Golang module designed to facilitate the creation of robust and feature-rich Kubernetes controllers. This framework offers a straightforward approach to building controllers with essential functionalities, including graceful shutdown handling, informer synchronization, and work queue management. Contrasted with the controller-runtime library, the controller-framework prioritizes simplicity and flexibility, making it an ideal choice for crafting controllers that closely resemble the traditional ones used within the Kubernetes project.

    Features

    • Graceful Shutdown: The Controller Framework ensures a smooth and graceful shutdown of your controllers. It allows ongoing workers to finalize and resources to be managed appropriately before the controller terminates.

    • Informer Synchronization: Easily synchronize informers with the controller-framework, enabling seamless tracking and reaction to changes in Kubernetes resources. The module abstracts the complexity of informer cache synchronization.

    • Workqueue Management: The framework streamlines work queue management, allowing tasks to be efficiently queued and processed. It handles retries and back-off strategies for any failed tasks, promoting reliability.

    • Simplicity and Flexibility: Prioritizing simplicity, the controller-framework minimizes boilerplate code, empowering developers to focus on implementing the core logic of their controllers.

    • Familiar Kubernetes Controller Paradigm: Controllers created using this framework mirror the established structure and design principles of traditional Kubernetes controllers. Developers familiar with Kubernetes controller development will find it intuitive to work with this framework.

    The original location for this framework is OpenShift library-go repository and this framework is used as controller framework for all OpenShift control plane operators. It has been proven stable, reliable and with minimum issues for multiple OpenShift releases.

    Installation

    Start to integrate the controller framework into your Golang project by using factory Go modules:

    import "github.com/mfojtik/controller-framework/pkg/factory"

    The factory provide a builder that produce all Kubernetes controller boilerplate. To learn how flexible it is, read the documentation

    func New() framework.controller {
        return factory.New().ToController("new-controller", eventRecorder)	
    }

    You can access the workqueue inside the sync() function via the controller context.

    func (c *controller) sync(ctx context.Context, syncCtx framework.Context) error {
    	syncCtx.Recorder().Eventf(...)
    	syncCtx.Queue().Add("key")
    }

    And finally, for Kubernetes Event management, you can use included Event Recorder which offers various backends for storing events (filesystem, Kubernetes Events, in-memory events, etc.)

    ...
    
    recorder := events.NewRecorder(client.CoreV1().Events("test-namespace"), "test-operator", controllerRef)
    
    ...

    Getting Started

    Utilizing the controller framework is straightforward. Here’s a simple example showcasing how to create a controller:

    // simple_controller.go:
    package simple
    
    import (
    	"context"
    	"errors"
    	"os"
    	"time"
    
    	"github.com/mfojtik/controller-framework/pkg/events"
    	"github.com/mfojtik/controller-framework/pkg/factory"
    	"github.com/mfojtik/controller-framework/pkg/framework"
    )
    
    type controller struct {}
    
    func New(recorder events.Recorder) framework.Controller {
    	c := &controller{}
    	return factory.New().
    		WithSync(c.sync).                // reconcile function
    		// WithInformers(secretInformer) // react to secretInformer changes
    		ResyncEvery(10*time.Second).     // queue sync() every 10s regardless of informers
    		ToController("simple", recorder)
    }
    
    func (c *controller) sync(ctx context.Context, controllerContext framework.Context) error {
    	// do stuff
    	_, err := os.ReadFile("/etc/cert.pem")
    	if errors.Is(err, os.ErrNotExist) {
    		// controller will requeue and retry
    		return errors.New("file not found")
    	}
    	return nil
    }
    
    // main.go:
    
    func main() {
    	// the controllerRef is an Kubernetes ownerReference to an object the events will tied to (a pod, namespace, etc)
    	recorder := events.NewRecorder(client.CoreV1().Events("test-namespace"), "test-operator", controllerRef)
    	
    	controller := simple.New(recorder)
    	
    	// when this context is done, the controllers will gracefully shutddown
    	ctx := context.Background()
    	
    	// start the controller with one worker
    	go controller.Run(ctx, 1)
    	...
    }

    Check the Examples for more controller examples.

    Contribution

    Contributions to the controller-framework are welcomed! Feel free to submit issues and pull requests via the GitHub repository.

    License

    The Controller Framework is distributed under the Apache v2 License. Refer to the LICENSE file for more details.

    Visit original content creator repository https://github.com/mfojtik/controller-framework
  • esxi-docker-registry

    esxi-docker-registry

    esxi-docker-registry

    Terraforms for a local Docker Registry on ESXi

    Requirements

    gnu make (Not “really” required, but will allow you to make use of the make commands linked to .tf.makefile. This is really only for Mac OS users) Note, you can of course write out your own terraform plan/apply/destroy commands.

    Terraform
    ESXi and VCSA (tested on ESXi 6.5u2 and VCSA 6.7)
    Domain name for the registry
    SSL certs

    VM Template

    This is uses CoreOS and a CoreOS template will need to be created. The name of the template should be named coreos-stable. The name of the template could be named according to your needs, be sure to update the variables.tf to reflect the proper template name.

    Setup

    make init:root
    

    This will bootstrap the terraform plugins and copy over the tfvars templates used to configure the terraforms. You can of course edit the provider.tf & variables.tf directly if you wish.

    Create your SSH keys

    make ssh-keygen
    

    SSL certs

    I’ve used letsencrypt, and the generated fullchain.pem and privkey.pem should be copied over to the ssl/ directory.

    If you are using another provider or self-signed please be sure to name them to the letsencrypt equivalents noted above. If you do not wish to rename, you will need to update the vm.tf‘s provisioner section for the correct filenames.

    Edit the .tfvars

    Edit the .provider.tfvars and the .variables.tfvars with your configurations.

    Backend

    This comes with a backend.tf.sample file which should be renamed to backend.tf if you wish to use it and assigned with your desired backend setup. This is optional and can be skipped.

    Deploying

    make tf:plan
    

    To test/create your plan.

    make tf:apply
    

    To apply your created plan.

    make tf:apply!
    

    Appeding the ! will automatically replan before applying.

    SSH

    make ssh
    

    Will read the ipv4_address output from terraform and setup your SSH command. Note the username is core.

    You can of course run your own command such as

    ssh -i .ssh/id_rsa core@<ipv4_address>
    

    Destroying

    make tf:destroy
    

    Will run the terraform destroy command. The make command has an extra key confirmation just to ensure this is really what you want to do.


    TODO

    • Create volume to for reattachable registry folder to allow rebuilding of the vm without registry data loss.
    Visit original content creator repository https://github.com/damncarousel/esxi-docker-registry
  • Weak

    Weak

    Build Status Platform codecov Swift Xcode SPM MIT

    Weak and Unowned as native Swift types. inspire by https://github.com/nvzqz/Weak

    The Problem

    Swift allows for weak and unowned bindings to objects out-of-the-box, but they can’t be used just anywhere.

    1. They can’t be used as associated values of enum cases.

    2. They can’t be passed as a parameter to a function, method, or initializer without increasing the reference count.

    Weak solves these two problems by giving you full control over how you want to pass around weak or unowned references.

    Installation

    Compatibility

    • Platforms:
      • macOS 10.9+
      • iOS 8.0+
      • watchOS 2.0+
      • tvOS 9.0+
      • Linux
    • Xcode 8.0
    • Swift 3.0

    Install Using Swift Package Manager

    The Swift Package Manager is a decentralized dependency manager for Swift.

    1. Add the project to your Package.swift.

      import PackageDescription
      
      let package = Package(
          ...
          dependencies: [
            ...
              .Package(url: "https://github.com/ytyubox/Weak.git", from: "1.0.0"),
          ],
          targets: [
          .target(
              name: "...",
              dependencies: ["Weak"])
      )
    2. Import the Weak module.

      import Weak

    Usage

    Weak References

    A Weak<T> instance acts just how weak var foo: T would. When the reference count hits 0, the object property becomes nil.

    let weakRef: Weak<SomeClass>
    
    do {
        let instance = SomeClass()
        weakRef = Weak(instance)
        print(weakRef.object == nil)  // false
    }
    
    print(weakRef.object == nil)  // true

    Unowned References

    An Unowned<T> instance should only be used when it will not outlive the life of object. Otherwise, accessing object will cause a crash, just like accessing any unowned reference after the reference count hits 0.

    let unownedRef: Unowned<SomeClass>
    
    do {
        let instance = SomeClass()
        unownedRef = Unowned(instance)
        print(unownedRef.object)  // SomeClass(...)
    }
    
    print(unownedRef.object)  // CRASHES

    License

    Weak is released under the MIT License.

    Visit original content creator repository https://github.com/ytyubox/Weak