This guide is only for the Lenovo ThinkPad L540. I am NOT responsible for any harm you cause to your device. This guide is provided “as-is” and all steps taken are done at your own risk.
Introduction
📖 Important instructions
Migrate to Version 1.7.0 and higher
The Version 1.7.0 changes the model from MacBookPro12,1 to MacBookPro11,4. You need to generate a new SMBIOS for the new model with GenSMBIOS.
The reason: ACPI Patches
These ACPI patches are necessary for booting macOS. OpenCore doesn’t only patch macOS, but also Windows and Linux. These operating systems handle the patches differently than macOS. If you decide to use OpenCore with other systems, you may expect some bugs like missing battery and WiFi issues.
EFI folders
This repo includes multiple EFI configuations for different macOS Versions.
💻 My Hardware
These are the Hardware component I use. But this OpenCore configuation **should still work** with your device, even if the components are not equal.
Category
Component
CPU
Intel Core i5-4300M
GPU
Intel HD Graphics 4600
SSD
Trendmicro M2 SSD 240GB
SSD
Samsung EVO SSD 240GB
SSD
Intenso SSD 240GB
Memory
8GB DDR3 1600Mhz
Camera
720p Camera
WiFi & BT
Intel Wireless-N 7260
Installation
📝 Requirements
You must have the following items:
Lenovo ThinkPad L540.
Access to a working Windows machine or macOS with Python installed.
A pendrive with more than 4 GB (Keep in mind, during the preperation we will format the disk to create the install media).
an Internet connection via Ethernet.
1-2 hours of your time.
⚙️ Preperation
Create the install media for Windows
First of all, you will need the install media of macOS. I will use macrecovery to download and create the macOS Install media.
After the download succeeded, type diskpart and wait until you see DISKPART>
Plug-in your pendrive and type list disk to see your disk id.
Select your pendrive by typing select disk <diskid>
Now we are gonna clean the pendrive and convert it to GPT. First, type clean and then convert gpt.
Note: If an error occurred, try to convert again by typing convert gpt.
After the pendrive is clean and converted, we will create a new partition where we can put our files on. First, type create partition primary, then select the new partition with select partition 1 and format it format fs=fat32 quick.
Finally, mount your pendrive by typing assign letter=J
Now, close the Command Prompt and create the folder com.apple.recovery.boot on the pendrive. Copy OpenCorePkg-master\Utilities\macrecovery\BaseSystem.dmg and Basesystem.chunklist into that folder.
Note: If you can’t find BaseSystem.dmg, use RecoveryImage.dmg and RecoveryImage.chunklist instead.
After the install media was created, we need to make the USB drive bootable.
Download the EFI folder from this repo, you will find the latest files under the release tab or just download the repo as it is. Move the folder to the root of your pendrive (e.g. J:) and rename the folder to EFI.
GenSMBIOS
We need a script, called GenSMBIOS, to create fake serial number, UUID and MLB numbers. This step is essential to have working iMessage, so do not skip it!
The process is the following:
Download GenSMBIOS as a ZIP, then extract it.
Start GenSMBIOS.bat and use option 1 to download MacSerial.
Choose option 2, to select the path of the config.plist file. It will be located in EFI -> OC folder.
Choose option 3, and enter MacBookPro11,4 as the machine type.
Press Q to quit. Your config now should contain the requied serials.
Enter the proper ROM value
After adding serials to your config.plist, you have to add the computer’s MAC address to the config.plist file. This step is also essential to have a working iMessage, so do not skip it. We need a Plist editior, to write the MAC address into the config.plist file. I used ProperTree, since it works on Windows too. You have to change the MAC address value in the config.plist at
PlatformInfo -> Generic -> ROM
Delete the generic 112233445566 value, and enter your MAC address into the field, without any colons. Save the Plist file, and it is now ready to be written out to the EFI partition of your install media.
Default keyboard layout and language
The default keyboard layout and language is German. To change the language, edit the value of NVRAM -> Add -> 7C436110-AB2A-4BBB-A880-FE41995C9F82 -> prev-lang:kbd to the value of your language. If your value contains an underscore _, replace it with a hyphen -. The value for English would be en-US:0. You can find a list of all language values here.
MultiBoot and Making Own Boot Entries
The default ScanPolicy value is 0. To make your own boot entries with own logos, edit the value of MISC -> Security -> ScanPolicy -> 19858179 to the value of your boot order (shows only OS what you add in MISC -> -> Entries -> ...). You can find the a guide here
Install OpenCore
After you’ve finished with the neccesary tweaks, you have to copy the EFI folder to the EFI partition of your pendrive.
🚚 Installation
Prepare BIOS
The bios must be properly configured prior to installing macOS.
In Security menu, set the following settings:
Security > Security Chip: must be Disabled
Memory Protection > Execution Prevention: must be Enabled
Internal Device Access > Bottom Cover Tamper Detection: must be Disabled
Anti-Theft > Current Setting: must be Disabled
Anti-Theft > Computrace > Current Setting: must be Disabled
Secure Boot > Secure Boot: must be Disabled
In Startup menu, set the following options:
UEFI/Legacy Boot: Both
UEFI/Legacy Priority: UEFI First
CSM Support: Yes
Now you can go through the install.
Install macOS
Boot from USB, press SPACE and select the USB drive inside of OpenCore "NO NAME (DMG)" or similar.
Note: The first boot may take up to 20 minutes.
Wait for the macOS Utilities screen.
Select Disk Utility, select your disk and click erase. Give a name and choose APFS with GUID Partition Map.
After erasing, go back and select Reinstall macOS and follow the steps on your screen. The installation make take up to 2 hours.
Note: Your PC will restart multiple times. Just boot from USB and select your disk inside of OpenCore. (named macOS Installer or the disk name).
Once you see the Region selection screen, you are good to proceed.
Create your user accound and everything else.
♻️ Upgrade macOS / Switch EFI
If you plan to upgrade your macOS (or updating the EFI / switching to HeliPort), you’ll need a different OpenCore configuation (EFI). Please follow these steps:
Note: Download the desired macOS version in the Settings before following these steps, if you are connected via WiFi.
Download the newest release & ProperTree and extract it.
Start ProperTree and load the Config.plist on your EFI partition. (File -> Open)
Note: You can mount your EFI partition by pressing WIN + SPACE, typing Terminal and enter the following command: sudo diskutil mountDisk disk0s1.
Now also load the new configuration file from the repo for the desired macOS installation (or HeliPort config).
You should now have 2 ProperTree-windows open on your screen.
Go in both windows to Root -> PlatformInfo -> Generic. Transfer MLB, ROM, SystemProductName, SystemSerialNumber and SystemUUID to the new config.
Save the new config (File -> Save) and close both windows.
Now delete your existing EFI folder from the EFI partition and copy the new one to it. (Make sure that the Directorys Boot and OC are in EFI).
If you want to upgrade macOS, download the desired macOS version in the Settings app and perform the upgrade like on a real Mac.
Post-install (optional)
💾 Install OpenCore to Hard drive
Press WIN + SPACE and open terminal. Type sudo diskutil mountDisk disk0s1 (where disk0s1 corresponds to the EFI partition of the main disk)
Open Finder and copy the EFI folder of your USB device to the main disk’s EFI partition.
Unplug the USB device and reboot your laptop. Now you can boot macOS without your USB device.
✏️ Create a offline install media (Optional)
In case of reinstalling macOS, a offline install media can save some time. You also don’t need an Ethernet connection for the installation.
To create a offline install media, you need the following stuff:
macOS Installer from the App Store.
A 16 GB pendrive (Keep in mind, during the preperation we will format the disk to create the install media).
Press WIN + SPACE and open Disk utility. Select your USB device and click erase. Name it MyUSB and choose Mac OS Extended with GUID Partition Map. After erasing the USB device, close Disk utility.
Now press WIN + SPACE and open terminal. Type the following command:
Simulator of Asteroid Malformation Under Stress, package designed for Taylor et al 2023 (link forthcoming). Questions on its use should be directed to astertaylor@uchicago.edu.
This code simulates the deformation of minor bodies, assuming that they are homogenous incompressible fluid masses. They are initialized as ellipsoids and the Navier-Stokes equations are interatively solved to investigate the deformation of the body over time. This package is highly modular, and allows for user-defined output functions, size, and trajectories.
SAMUS is structured as a single large class, which allows for variables to be stored and for arbitrary function calls. A single high-fidelity simulation run can be quite lengthy, and so this allows for ease of debugging and investigation. It utilizes Python3.8 and above, and depends on the numpy, FEniCS, DOLFIN, UFL, SciPy, pandas, quaternion, and mpipy packages.
Further description of SAMUS can be found in Taylor et al 2023 (found on the ArXiv here (LINK)) and in the in-line documentation.
NOTE: SAMUSv1.0.0 assumes that the object follows a body-frame fixed non-principal axis rotation, which is not fully physical. This rotation is primarily used to compute the deforming forces, but otherwise is unenforced. If complex rotation is necessary for your usecase, testing and potential modification are recommended.
Examples of SAMUS’s use are given in the examples folder.
Installation
There are two primary methods of installing SAMUS:
Install through the Python Package Index (PyPI): pip install SAMUS
Install the developer’s version on GitHub: git clone https://github.com/astertaylor/SAMUS cd SAMUS python setup.py install (Note that this command may require a sudo instruction.)
SAMUS File Tree
setup.py: Setup file for the package. LICENSE.txt: Text file containing the license for use of this code. README.md: Markdown file with basic documentation. SAMUSfig.jpg: JPG file with the flowchart shown below, for ease of understanding.
build
Folder containing the build documents. Auto-generated with pip.
docs
Folder containing documentation and examples of use.
SAMUS
Folder containing package itself.
modelFile.py: Primary file, containing the SAMUS model class.
__init__.py: Initializing file for the package.
meshes
Folder containing meshes for use by SAMUS. Users should not have to interact with this.
__init__.py: Initializing file for the subpackage.
3ball.geo: GMSH file which contains the simple spherical mesh. Used to create the various improvements.
3ball?.msh: GMSH file containing the mesh, which has undergone ? refinements by splitting.
3ball?.xml: xml file containing the mesh, which has undergone ? refinements by splitting.
testing
Folder containing scripts for testing SAMUS and the discretizations it uses.
__init__.py: Initializing file for the subpackage. example_traj.csv: csv file with simple, short trajectory information, for use in validations. example_traj.txt: txt file with simple, short trajectory information, for use in validations. hyperbolic_traj.csv: csv file with hyperbolic trajectory information, for use in validations. hyperbolic_traj.txt: txt file with hyperbolic trajectory information, for use in validations. mesh_validation.py: Python script which runs simulations, validating the use of the lowest-refined mesh via doubling test. modularity_example.py: Python script which runs simulations and demonstrates the modular use of SAMUS.
trajectory_jump_validation.py: Python script which validates the use of the trajectory jump method via doubling test. euler_step_validation.py: Python script which validates the use of Euler finite-difference time steps via a doubling test.
logs
Folder containing the outputs from these testing simulations.
coarse_mesh_7.txt: Running log from a coarse-mesh run, run by mesh_validation.py. Outputs_coarse_mesh_7.csv: Output log from from a coarse-mesh run, run by mesh_validation.py. finer_mesh_7.txt: Running log from a finer-mesh run, run by mesh_validation.py. Outputs_finer_mesh_7.csv: Output log from from a finer-mesh run, run by mesh_validation.py. Compare this file to Outputs_coarse_mesh_7.csv to demonstrate that the mesh usage is validated. standard_tolerance_7.txt: Running log from a standard-tolerance run, run by trajectory_jump_validation.py. Outputs_standard_tolerance_7.csv: Output log from from a standard-tolerance run, run by trajectory_jump_validation.py. halved_tolerance_7.txt: Running log from a halved-tolerance run, run by trajectory_jump_validation.py. Outputs_halved_tolerance_7.csv: Output log from from a halved-tolerance run, run by trajectory_jump_validation.py. Compare this file to Outputs_standard_tolerance_7.csv to demonstrate that the trajectory jump usage is validated. standard_timestep_7.txt: Running log from a standard-timestep run, run by euler_step_validation.py. Outputs_standard_timestep_7.csv: Output log from from a standard-tolerance run, run by euler_step_validation.py. doubled_timestep_7.txt: Running log from a double-timestep run, run by euler_step_validation.py. Outputs_doubled_timestep_7.csv: Output log from from a double-timestep run, run by euler_step_validation.py. Compare this file to Outputs_standard_timestep_7.csv to demonstrate that the usage of a Euler finite-difference timestep is validated.
examples
Folder containing examples of SAMUS‘s use. There are .ipynb and .py files for both examples. The .ipynb files have greater documentation, and the .py files are more efficient to run.
__init__.py: Initializing file for the subpackage. example_traj.csv: .csv file with simple, short trajectory information, for use in validations. example_traj.txt: .txt file with simple, short trajectory information, for use in validations. Basic_Usage_Example.ipynb: A Jupyter Notebook file with a very basic example of SAMUS‘s use. This file has relatively extensive documentation, and should be used to gain greater understanding of how SAMUS works. basic_usage_example.py: A Python script with a very basic example of SAMUS‘s use. This file should be run by the learner, as it is capable of being run with mpirun and runs significantly faster than the corresponding .ipynb file. Modularity_Example.ipynb: A Jupyter Notebook file with an example of SAMUS‘s modular functionalities. This file has relatively extensive documentation, and should be used to gain greater understanding of how SAMUS works. modularity_example.py: A Python script with an example of SAMUS‘s modular functionalities. This file should be run by the learner, as it is capable of being run with mpirun and runs significantly faster than the corresponding .ipynb file.
logs
Folder containing the outputs from these example simulations.
basic_example_6.txt: Running log from the basic example, run by basic_usage_example.py. Outputs_basic_example_6.csv: Output log from from the basic example, run by basic_usage_example.py. modularity_example_6.txt: Running log from the basic example, run by modularity_example.py. Outputs_modularity_example_6.csv: Output log from from the basic example, run by modularity_example.py.
Pseudocode Flowchart
Below is a flowchart demonstrating the basic use case of SAMUS, as laid out in the various example files.
Experience the first Quantic Dream game in proper widescreen for the first time since 1999. No more stretching or field of view reduction at 16:9 or wider.
Copy D3DImm.dll and DDraw.dll from \MS\x86\ of the archive to the game folder (next to the Runtime file).
As an option, also copy dgVoodooCpl.exe and dgVoodoo.conf from the archive and run the exe to remove the dgVoodoo watermark or configure the visuals (e.g. disabling mipmapping under DirectX will make the game textures look sharper).
Press the hotkey as displayed to toggle the fix in real time.
Notes
All trainers based on CE components may trigger some anti-virus software.
Tested on the latest Steam version at 2560×1080, 3440×1440, 3840×1080, 5760×1080 and 11520×1080. The UI spans, making it undesirable for triple monitor setups.
importReactfrom'react'import{SSEQRCode}from'SSEQRCode'classAppextendsReact.Component{handleScan=ret=>{alert(`Logged in as ${ret}`)}render(){return(<div><SSEQRCodesseURL='/api/sse'onScanned={this.handleScan}/></div>)}}
Props
prop
type
required
description
sseSource
EventSource
when sseURL is null
provided EventSource
sseURL
string
when sseSource is null
URL of the source
width
number or string
width property on img tag, default 200
height
number or string
height property on img tag, default 200
keepAlive
boolean
whether to close connection after qrcodeEvent was received, default false
The Face Recognition Attendance System is a Python-based application that uses OpenCV, Tkinter, and other libraries to take images of students, train a machine learning model on the images, and track student attendance based on face recognition. It allows users to:
Capture face images of students and save them.
Train a model to recognize faces.
Track student attendance and log it in a CSV file.
Features
Capture Student Faces: Takes images of students for training the face recognition model.
Train Model: Trains the model using the images captured, allowing the system to recognize students’ faces.
Mark Attendance: Marks student attendance by recognizing faces during real-time video capture.
Save Attendance: Saves attendance data in a CSV file.
GUI Interface: The application uses Tkinter for a user-friendly interface.
Notification System: Displays real-time notifications to the user on various actions, such as saving images or training the model.
Requirements
Before running the application, make sure you have the following Python libraries installed:
opencv-python
Pillow
pandas
numpy
tkinter (Usually pre-installed with Python)
csv
datetime
To install the required libraries, run:
pip install opencv-python Pillow pandas numpy
Files
StudentDetails.csv: Stores student roll numbers and names.
TrainingImage/: Directory where student face images are saved.
TrainingImageLabel/Trainner.yml: Saved machine learning model for face recognition.
Attendance/: Directory where attendance logs are saved.
haarcascade_frontalface_default.xml: Pre-trained classifier for face detection (downloadable from OpenCV repository).
Usage Instructions
Start the Application:
Run the script to launch the Face Recognition Attendance System.
python attendance_system.py
Capture Student Faces:
Enter the Roll No and Student Name in the provided fields.
Click on Take Images.
The system will open a webcam window, and the student will need to stay in front of the camera for face detection.
Once enough images are captured, the system will notify the user.
Train the Model:
Click on Train Model to train the face recognition model using the captured images.
The model will be saved as Trainner.yml for future use.
Mark Attendance:
Click on Mark Attendance to start face recognition.
The system will use the webcam to detect faces in real time and match them with the trained model.
Attendance will be saved in a timestamped CSV file under the Attendance/ folder.
Clear Fields:
Click on Clear to reset the input fields and messages.
Exit:
Click on Quit to close the application.
Directory Structure
- Face_Recognition_Attendance_System/
    - StudentDetails.csv              # Stores student details (Roll No and Name)
    - TrainingImage/                  # Captured images of students' faces
    - TrainingImageLabel/             # Folder where the trained model (Trainner.yml) is stored
    - Attendance/                     # Folder to store the attendance logs
    - haarcascade_frontalface_default.xml  # Pre-trained face detection model (downloadable from OpenCV)
    - attendance_system.py            # Python script to run the system
Notes
Roll No should be numeric, and the Name should only contain letters and spaces.
The system uses LBPH (Local Binary Pattern Histogram) face recognition for training and prediction.
The system assumes a webcam is available for face capture and recognition.
The application saves attendance in a CSV file named Attendance_DDMMYYYY.csv.
Troubleshooting
Ensure that the webcam is accessible and working properly.
If the haarcascade_frontalface_default.xml file is missing, download it from here.
If the StudentDetails.csv file is not found, the system will display an error message. Ensure the file is in the same directory as the script.
Extract archive to <redmine>/plugins. Make sure the plugin directory is called <redmine>/plugins/redmine_dashboard/ (#11).
Install required dependencies by running bundle install --without development test in your Redmine directory. Note: Bitnami and other appliance are not officially supported and may need additional option e.g. --path vendor/bundle (#58).
A database migration is not needed. Restart Redmine.
Configure Redmine
Add the dashboard module to your project (Settings > Modules).
Configure dashboard permissions to your user roles (Administration > Roles and permissions). Users won’t see a Dashboard tab without having the View Dashboard permission.
Upgrade
Remove old plugin directory.
Follow installation steps for new release.
Contribute
I appreciate any help and like Pull Requests. The main branch is the current stable branch for v2. The next version, Redmine Dashboard 3, a complete rewrite had been under development on the develop branch. Due to limited available time the project is in maintenance only mode but open to new contributors.
I gladly accept new translations or language additions for any version of Redmine Dashboard. I would prefer new translations via Transifex, but you can also send a Pull Request. Feel free to request new languages or to join the team directly on Transifex.
License
Redmine dashboard is licensed under the Apache License, Version 2.0.
See LICENSE for more information.
This is a client-side library that can be used to instrument PHP apps for distributed trace collection,
and to send those traces to Jaeger. See the OpenTracing PHP API
for additional detail.
Samples maximum specified number of traces (requests) per second.
Requirements
psr/cache PSR-6 cache component to store and retrieve sampler state between requests.
Cache component is passed to Jaeger\Config trough its constructor.
hrtime() function, that can retrieve time in nanoseconds. You need either php 7.3 or PECL/hrtime extension.
Configuration
'sampler' => [
    'type' => Jaeger\SAMPLER_TYPE_RATE_LIMITING,
    'param' => 100 // integer maximum number of traces per second,
    'cache' => [
        'currentBalanceKey' => 'rate.currentBalance' // string
        'lastTickKey' => 'rate.lastTick' // string
    ]
],
Dispatch mode
The library supports 3 ways of sending data to Jaeger Agent:
Zipkin.thrift over Compact protocol (socket – UDP) – default
Jaeger.thrift over Binary protocol (socket – UDP)
Jaeger.thrift over Binary protocol (HTTP)
If you want to enable “Jaeger.thrift over Binary protocol” one or other, than
you need to set dispatch_mode config option or JAEGER_DISPATCH_MODE env
variable.
Allowed values for dispatch_mode are:
jaeger_over_binary_udp
jaeger_over_binary_http
zipkin_over_compact_udp
There are 3 constants available, so it is better to use them:
A possible config with custom dispatch_mode can look like this:
// config.phpuseJaeger\Config;
return [
'sampler' => [
'type' => Jaeger\SAMPLER_TYPE_CONST,
'param' => true,
],
'logging' => true,
"tags" => [
// process. prefix works only with JAEGER_OVER_HTTP, JAEGER_OVER_BINARY// otherwise it will be shown as simple global tag"process.process-tag-key-1" => "process-value-1", // all tags with `process.` prefix goes to process section"process.process-tag-key-2" => "process-value-2", // all tags with `process.` prefix goes to process section"global-tag-key-1" => "global-tag-value-1", // this tag will be appended to all spans"global-tag-key-2" => "global-tag-value-2", // this tag will be appended to all spans
],
"local_agent" => [
"reporting_host" => "localhost",
// You can override port by setting local_agent.reporting_port value "reporting_port" => 6832
],
// Different ways to send data to Jaeger. Config::ZIPKIN_OVER_COMPACT - default):'dispatch_mode' => Config::JAEGER_OVER_BINARY_UDP,
];
The full example you can see at examples directory.
By default, for each dispatch_mode there is default reporting_port config value. Table with
default values you can see below:
dispatch_mode
default reporting_port
ZIPKIN_OVER_COMPACT_UDP
5775
JAEGER_OVER_BINARY_UDP
6832
JAEGER_OVER_BINARY_HTTP
14268
IPv6
In case you need IPv6 support you need to set ip_version Config variable.
By default, IPv4 is used. There is an alias Config::IP_VERSION which you can use
as an alternative to raw ip_version.
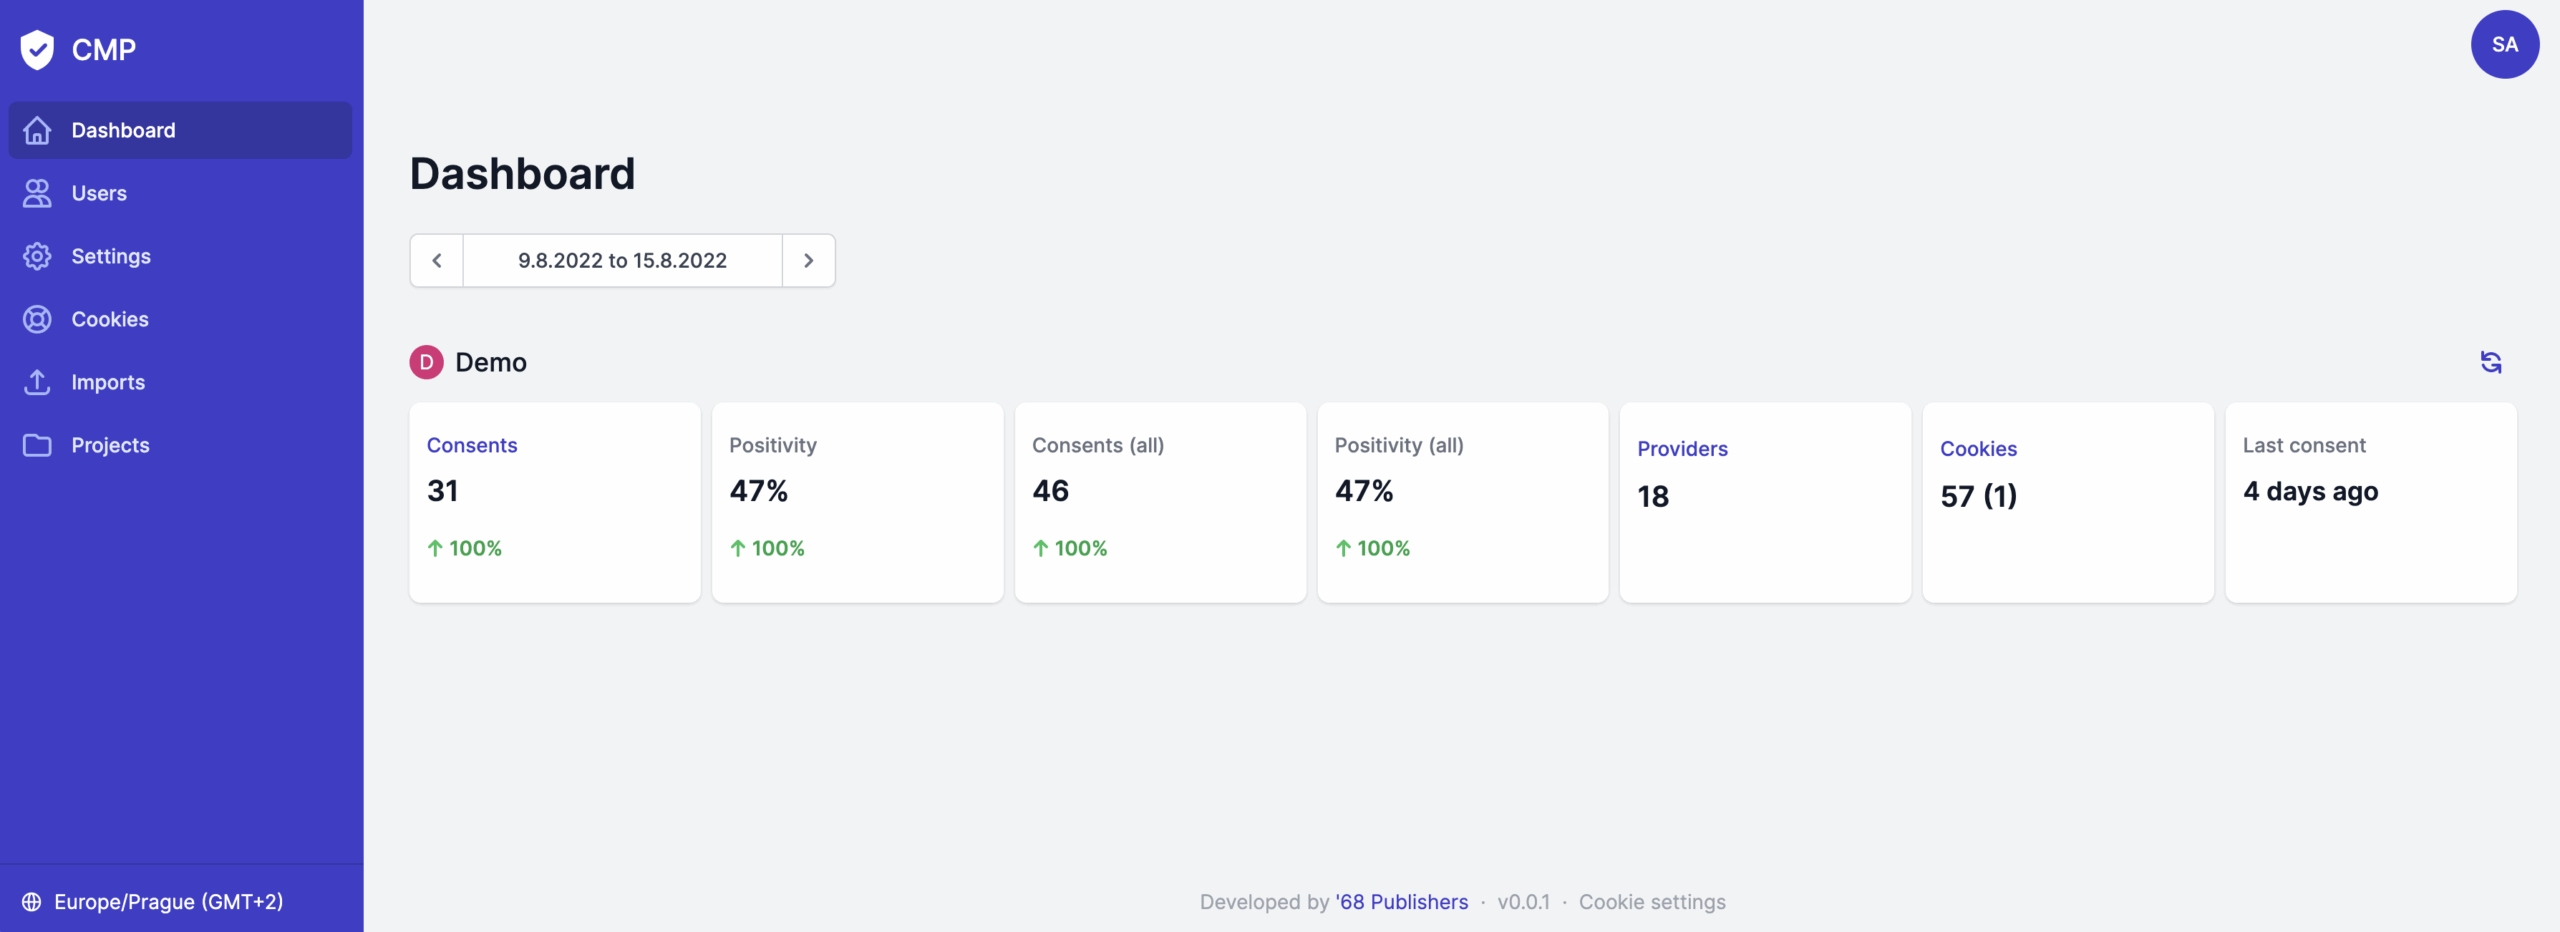


 https://github.com/68publishers/consent-management-platform